Installing Bathroom Sink Drain Pipe
Connect a sink or sink to the drain
Level of difficulty: Medium.
Tools needed
A sink drain with its grille, gaskets and fixing screw. A lavatory drain with its damper, gaskets and drain system (zipper, connecting Clevis and rod connected to the drain). A special sanitary putty bead. A cutter. A siphon. a screwdriver. Possibility of an overflow fitting with its gasket and its fixing screw (is placed on models of specific, integrated overflow).
Despite the slight variants of models of sinks and washbasins, their fittings to the drain are similar. That is why we will deal here with these two cases in a parallel way by giving you the maximum of explanatory details so that you can install the one you want.
Step 1: Disassemble the drain.
The bonds sold in commercial are almost always pre-assembled. So your first task will be to dismantle it. Then take advantage of this moment to visualize how these different components fit together and the position of the joints.
To disassemble the drain, you do not have to use tools. Separate the upper and lower parts of the drain and start the installation.
Step 2: Mount the drain in its location.
Before mounting the drain of the sink or sink, you must ensure the watertightness around the hole where the drain will come.
To do this, shape the sanitary putty cord in your hands. The heat communicated will then make it malleable. Give it the shape of a thick lace, as you would with Playdough. Then form a gasket by placing the putty on the outer edge above the orifice, as shown below. Note that for some models of sink drain, the use of mastic is unnecessary since replaced by the installation of an open circular gasket, supplied with the stopper (see right-hand diagram).
Then place on the gasket you have just installed, the upper part of the drain. Then close the lower part with the gasket to secure the connection on the other side of the wall and secure the two parts together.
For sinks, the fixing of the elements of the drain is ensured by a large central screw, which you will tighten to the screwdriver. Place the gasket in the housing provided for this purpose on the lower part of the drain. Then use both hands to assemble and fix the two parts, one turning the screwdriver up and the other supporting the underside of the bottom drain. To facilitate your work, prescrew the fixing screw at the top of the drain.
For Washbasins, the end of the drain is protruding at the other end of the hole under the sink, leaving an external screw step. Before proceeding with the assembly of the drain, slide the gasket around this screw step until it is placed against the ceramics of the lavatory, then close the drain by screwing the bottom.
Using the blade of a cutter, cut the burrs produced by the gasket flush with the edges of the drain. Indeed, while you were mounting the drain, the pressure caused by the fixation crushed the gasket and the excess overflowed.
Step 3: Install an overflow fitting from a sink.
Sinks that are not directly equipped with a built-in overflow must be equipped with an extra overflow fitting with a suitable drain to be able to drain excess water when the sink plug is installed. This replacement device ensures the same function as the built-in overflow: prevent water from overflowing.
It should be specified that this case is specific to stainless steel sinks. To install the overflow fitting, connect the components as follows. It is the fixing screw of the chain that allows to keep it at the edge of the sink. You will need a screwdriver.
In the stainless steel double-tray sink configurations, which require that you put a drain on each side, the overflow is placed in the middle and connects either to the horizontal connection element that connects the two bonds, in front of the single outlet for the siphon, either directly on one of the jumps as on the next sink.
Step 4: Install the drain system of a washbasin.
Unlike sinks that simply have a plug (see previous diagram), washbasins are usually equipped with a zipper system that controls the opening and closing of the drain through a damper.
If this zipper is not pre-assembled, insert the drain control rod on the back of the faucet. Position the zipper rod on the drain by screwing it by hand and taking care to slide the zipper rod into the hole in the connecting clevis that ends the end of the rod (see diagram below). Then tighten the clevis fixing screws with a screwdriver to connect the whole assembly, with the binding clevis slightly lower than the connector to the drain when the zipper is in the closed position.
Insert the damper into the hole in the drain and perform a test by operating the handle of the zipper behind the faucet to check that the valve closure and opening are properly adjusted. If this is not the case, loosen the screws on the clevis to reposition it to a satisfactory result.
Step 5: Connect the drain to the siphon and the siphon to the drain line.
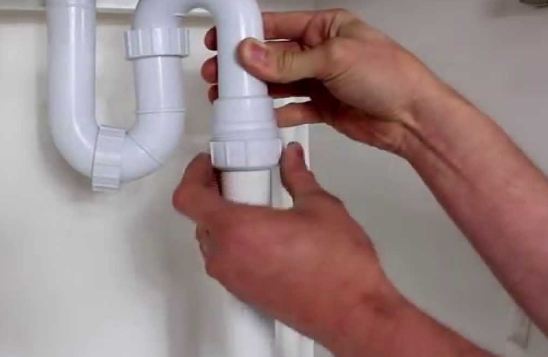
Start by mounting the components of the siphon to be installed by screwing the parts in by hand, without forgetting to place the joints on each fitting to ensure the tightness of the assembly. Attach the top of the siphon to the screw on the bottom of the drain and connect it to the drain hose.
Confuse? I have Installing Bathroom Sink Drain Pipe Video
Hopefully, this tips, video, and photos about Installing Bathroom Sink Drain Pipe are useful for writers in particular also dear readers in general. Thanks were visiting my blog, I believe you enjoy with my post, Good Luck !!!

